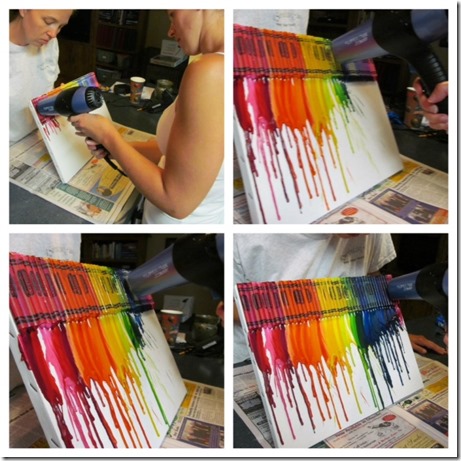
Recently I was talking with some of my friends about what they have been doing during their winter days (we have a lot of them here, and more to come) with their children. Most of us are on the lookout for fun creative activities to help occupy us and our children. This got me thinking back to last summer when I was in Florida staying with my friend Kim…
Picture a beautiful, sunny, 85 degree day. Perfect weather for playing outside, going for a run, heading to the beach, etc. Therefore, you would expect us to be outside making the most of such a great day…Wrong!! Instead, Kim and I decided we wanted to try a craft we saw on Pinterest. I’m sure many of you have seen the whole “melt the crayons” art work that has been floating around Pinterest. Well, we gave it a try, and it was a smashing success! Kim and I were actually way more into it than our son’s were. Our kids just wanted to play outside and enjoy the weather.
Crayon Art
Supplies:
- Hot glue gun and glue sticks
- Crayola crayons…you choose the colors you want
- Canvas frame…choose your own size
- A hair dryer or embosser…the embosser will work better
First, choose the crayons you want to use and lay them out on the top of the canvas to make sure they all fit properly. Then, using the hot glue gun, glue each crayon onto the canvas with the tip of the crayon pointing to the bottom of the canvas. Once completed, make sure the glue on the crayons has cooled completely before you begin to melt the crayons.


Now, using your embosser or hair dryer (make sure you have the dryer set on low, or you will blow melted crayon everywhere) begin heating the crayons. Make sure you have your canvas tipped at an angle so the melted crayons can flow towards the bottom of the canvas. I had the dryer pointed at the top end of the crayon in order to melt as much of it as I could.


Once you have finished, keep the canvas propped up until the wax has melted completely. Then, hang your new art on a wall!! I highly suggest you give this project a try if you are looking for something fun, easy, cheap, and creative to do!
***Note: Over half way through our crayon melting, Kim got out her embosser. We discovered the embosser worked so much better than a hair dryer. The embosser kept the wax hotter longer, so that it could “flow” down the canvas more. Not to mention, it didn’t blow the air out as hard as a hair dryer, making it easer to control where the melted crayon flowed.


